Family mruby OS: A Multi-VM MicroRuby System Built on FreeRTOS

Today, I’d like to introduce Family mruby, a personal project I’ve been working on recently, and its evolution into Family mruby OS.
(This post is translated from a previous post)
Background and Motivation
Family mruby is a project that I originally started in 2019.
I also presented an early prototype at RubyKaigi Takeout 2020.
What is Family mruby?
Long ago, BASIC was often the first programming language that children encountered.
Despite its limitations, there were products like Family BASIC, which allowed BASIC programming not only on PCs but also on platforms such as the MSX or the Famicom(NES). Many programmers discovered the joy of programming through these environments.
Today, development environments for most programming languages are freely available and easily installable on PCs. However, because so much is possible, beginners often don’t know where to start. Even reaching the point where you can make something slightly beyond “Hello World,” such as a simple game, can require a surprisingly high setup cost.
With that in mind, I wanted to create an environment where you could build small games or applications using a scripting language on a single microcontroller board. That idea became Family mruby.
Features of the Original Family mruby
- Standalone mruby editor and execution environment running directly on ESP32
- Designed to run on ESP32 with PSRAM
- Custom-designed dedicated hardware board
- VGA video output
- Analog audio output
- PS/2 keyboard input
Dormant Period
Due to the COVID-19 pandemic and the busyness of my personal life, development stopped for a while.
Still, the idea of rebooting the project always lingered in the back of my mind.
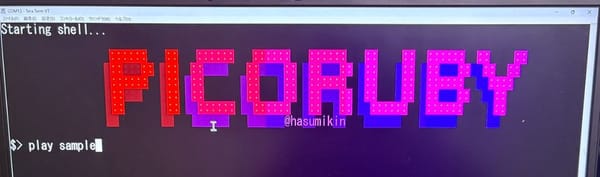
Encounter with PicoRuby / MicroRuby
While I was away from the project, I learned that @hasumikin had developed PicoRuby, which greatly inspired me.
In my original implementation, I ported raw mruby to the ESP32 and built a custom editor on top of it. PicoRuby, however, was much more resource-efficient and implemented many features that significantly improved user experience, such as a filesystem and USB device support.
Inspired by this design philosophy, I decided to rebuild my own ideal mruby development and execution environment from scratch.
PicoRuby is based on the mruby/c VM, but I heard that MicroRuby would be based on the standard mruby VM, which meant I could leverage my previous mruby experience.
By 2025, my personal life had stabilized enough to allow me to fully reboot the project and resume development seriously.
Differences Between the Original and the New Family mruby
During the project’s dormant period, I changed jobs and shifted from a PM-focused role back to hands-on coding. With my development instincts refreshed, I decided to design the new system with a “do everything I want” mindset, partly as a skills refresher.
The architecture of the original Family mruby looked like the diagram below.
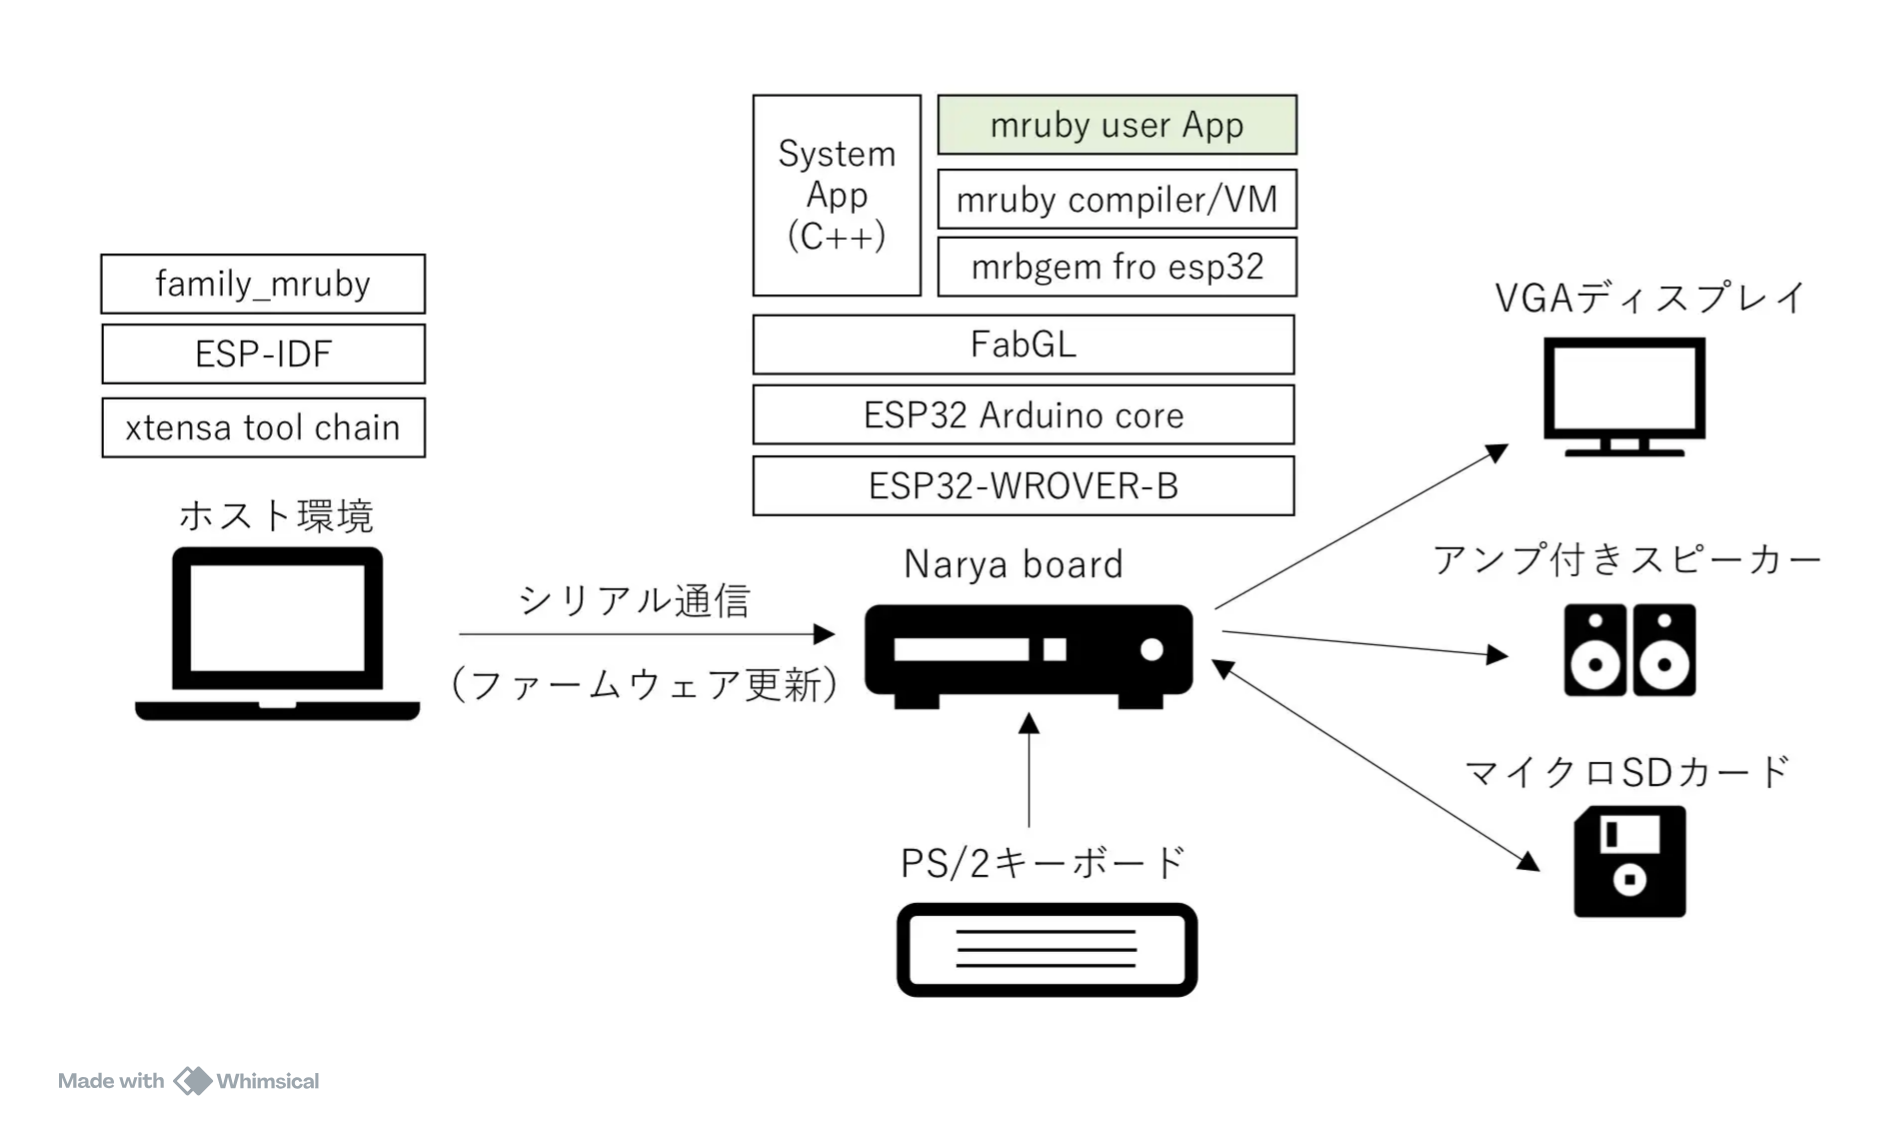
The new Family mruby architecture is shown in the next diagram.
The system has been reconstructed as an OS, allowing the world of “developing and running software in mruby” to expand significantly.
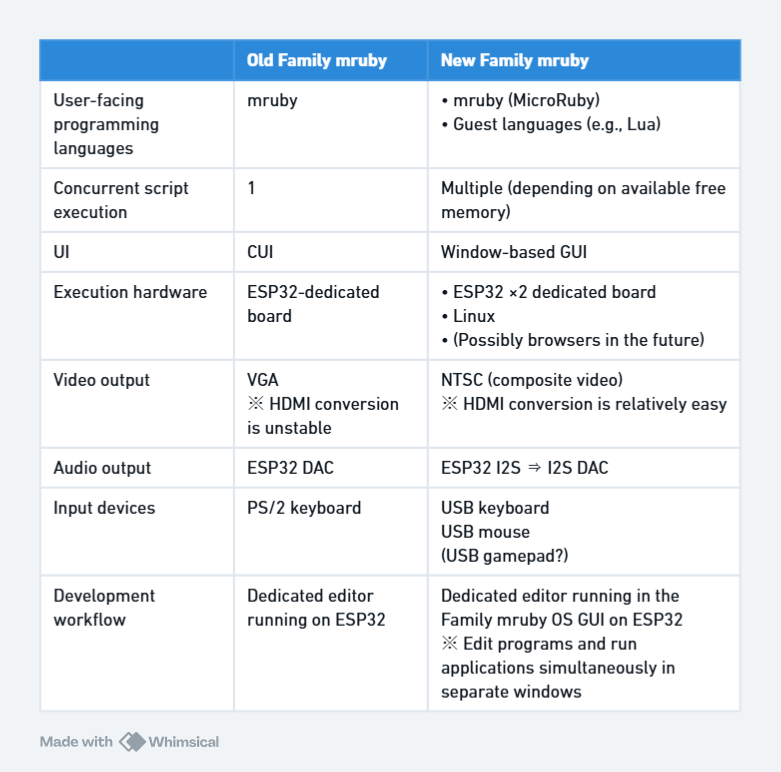
The main differences are summarized in the table below.
To address pain points from the original version—such as the cumbersome setup for PS/2 keyboards and VGA output—I switched to USB devices and enabled development on Linux as well.
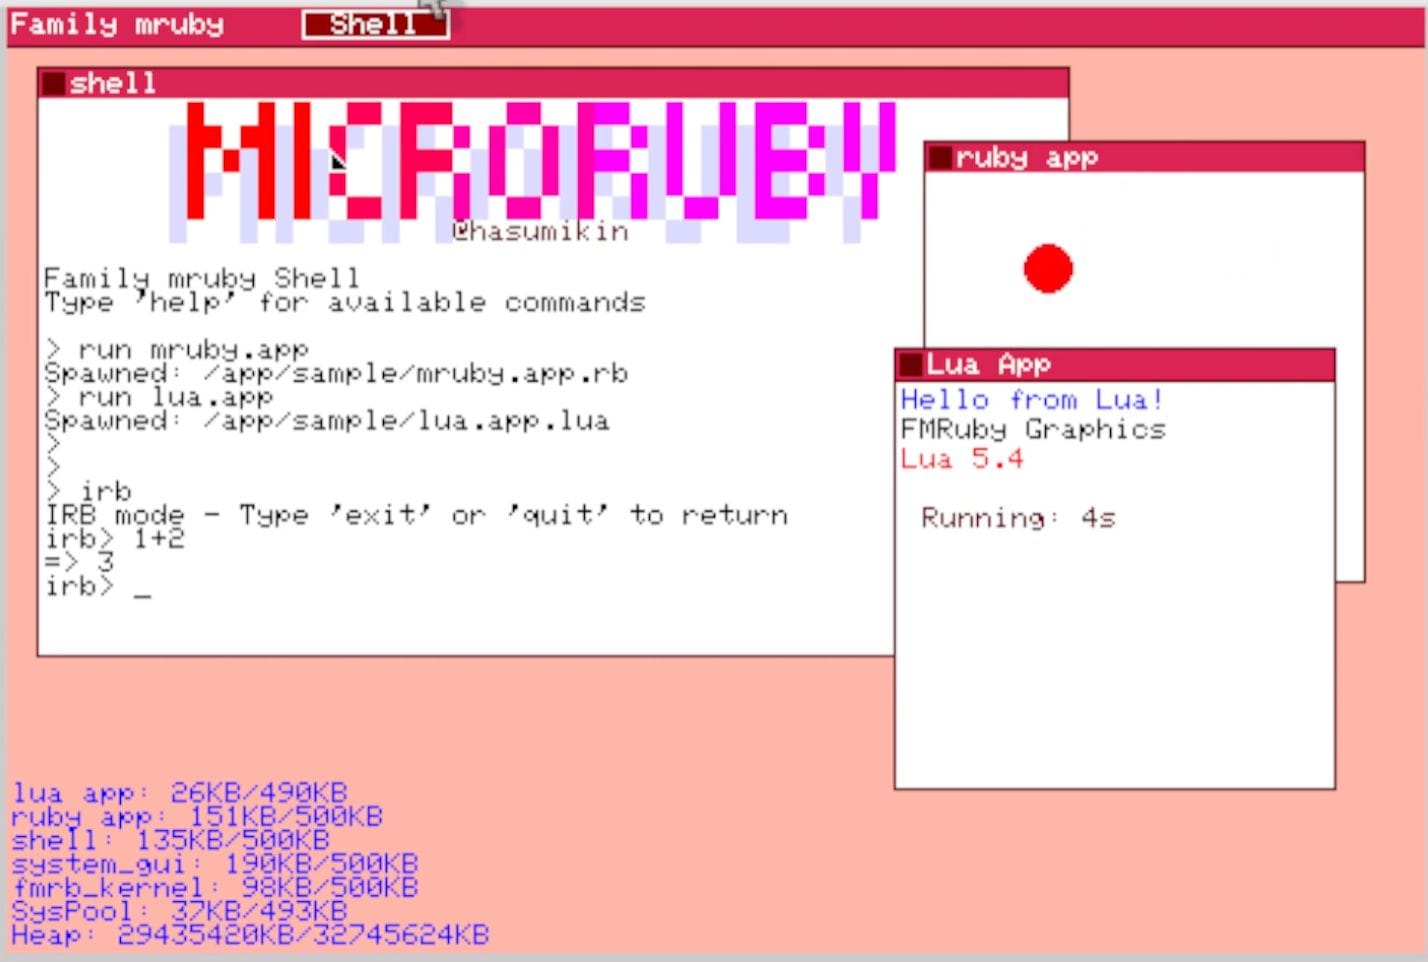
Family mruby OS
In the new Family mruby, USB mice can also be connected. Taking advantage of this, I wanted to provide a simple window-based GUI inspired by Windows 3.1 and FM-TOWNS OS, which I personally grew up with.
Since ESP-IDF is built on FreeRTOS, I realized that it should be possible not only to run mruby code but also to execute multiple VMs concurrently.
I decided to call this new environment Family mruby OS.
Assumptions
Compared to PicoRuby and similar systems, Family mruby OS is expected to require several times more memory.
Therefore, it assumes an ESP32 equipped with several megabytes of PSRAM, such as:

In a sense, this might be the “luxurious microcontroller environment” that mruby originally envisioned.
In the future, I’d also like to support the ESP32-P4.
Key Features
Adoption of MicroRuby
By using MicroRuby as the primary VM, we benefit from its compact yet dynamic compilation capabilities, as well as various picoruby-gems.
Since MicroRuby is under active development and may introduce breaking internal changes, it’s important to track upstream carefully rather than maintaining a fork.
I initially considered PicoRuby for its stability, but since mruby/c relies heavily on global variables, it appeared difficult to isolate memory spaces cleanly, so I decided against it.
MicroRuby’s built-in multitasking features remain useful. Combined with FreeRTOS-level concurrency (machine-code level), we can also retain bytecode-level concurrency.
(Currently, instead of using interrupt handlers, each VM’s tick is driven from a dedicated task.)
Multi-VM Architecture
FreeRTOS is a real-time operating system that provides task functionality.
Each task (similar to a thread) has its own stack and can operate independently.
By placing one VM per task and creating multiple tasks, multiple VMs can run concurrently.
To make this possible, memory isolation and hardware resource separation are essential.
To manage VMs like processes, various supporting mechanisms have been implemented.
FreeRTOS Thread Local Storage (TLS) is used to manage VM contexts.
Each VM is assigned its own memory allocator handle, limiting its accessible memory to a predefined pool. This approach:
- Prevents system-wide memory fragmentation
- Isolates failures so one VM does not corrupt others
- Improves overall system stability
In the worst case, a misbehaving application can be terminated, its memory pool reallocated, and restarted.
(Of course, illegal memory access at the C level or hardware resource conflicts are a different matter.)
To avoid busy loops in a resource-constrained environment, event waiting is implemented using FreeRTOS queues.
When inter-VM events arrive, the corresponding callback method is invoked immediately in the target VM.
As long as memory and hardware resources are properly isolated and size constraints are met, languages other than mruby can also be supported.
Currently, Lua is integrated as a proof of concept, and MicroPython is a future candidate.
Hardware Abstraction
With a system of this scale, development directly on a microcontroller can be challenging.
To address this, all hardware- and OS-dependent functionality is accessed through an abstraction layer.
As a result, the same code can now run on Linux as on the ESP32.
This leverages ESP-IDF’s Linux build support and LovyanGFX, which can also run on Linux via SDL2.
A well-defined abstraction layer improves portability and opens the door to future possibilities such as:
- Running via WASM
- Supporting new board designs
One challenge is that existing picoruby-gems for peripherals may not align perfectly with Family mruby OS’s abstraction model, especially regarding memory management.
Additionally, many are not designed for multi-VM environments, so some form of mutual exclusion will likely be required.
For GPIO and I2C, I think I should rewrite implementations to be thread-safe while using the hardware abstraction layer (HAL).
Development Location
Development is carried out under the following GitHub organization:
Documentation is still sparse, but I plan to improve it gradually.
Execution Environments
Family mruby is designed to run either on dedicated hardware or on Linux.
Dedicated Hardware
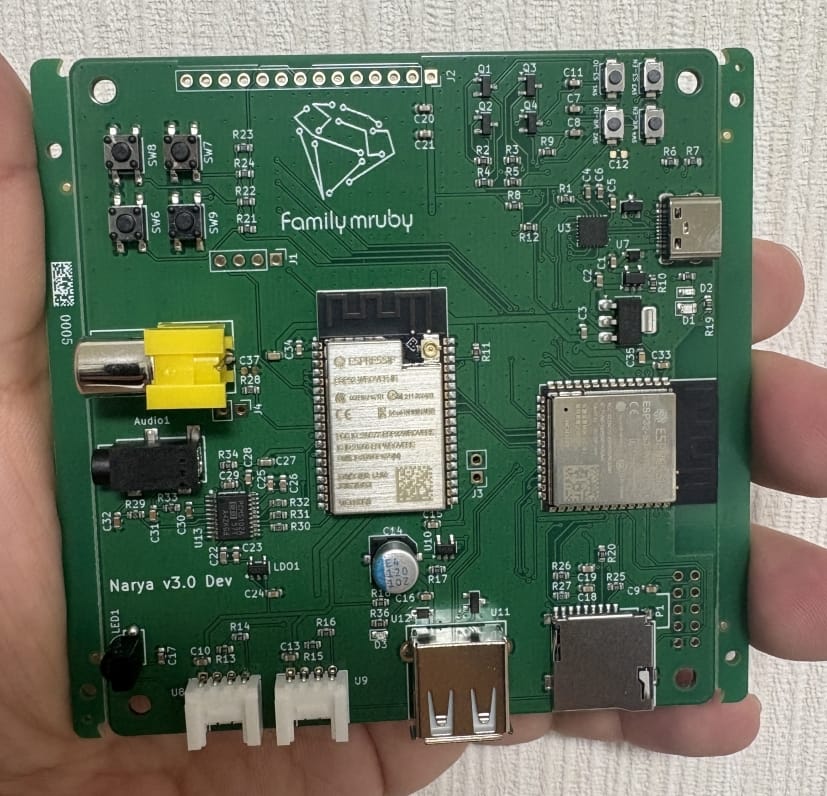
There is no mass-produced board yet, but I designed a development board and had it assembled via JLCPCB’s PCBA service.
Unfortunately, it didn’t work as expected, and debugging is currently underway.
The rough block diagram is shown below.
In a somewhat desperate move, I mounted two ESP32 chips on the board. Someday, with an ESP32-P4 and a dedicated display, I might be able to consolidate this into a single chip.
All hardware design data is publicly available:
Here is a photo of the actual development board. The BOM was correct, and assembly quality was excellent.
This was my first time having through-hole components assembled as well, which was a valuable learning experience.
Linux
By using ESP-IDF’s Linux simulation along with SDK2 and LovyanGFX, fmrb-core runs almost unchanged on Linux.
The secondary ESP32 is represented by a separate process.
Instead of SPI, communication is implemented using a custom protocol over sockets.
Current Demo
I recorded a demo video of Family mruby OS. So far I’ve only verified it in the Linux environment, so my next step is to finish debugging the board and then get the same setup running on the ESP32 in the near future.
The OS management features, the wallpaper/system bar screen, and a pseudo-shell app are each running in their own independent MicroRuby VM. Lua is also running separately in its own VM.
Since there’s no launcher yet, I open the pseudo-shell and Lua windows in response to mouse clicks.
The pseudo-shell app doesn’t implement shell functionality yet, but keyboard input is sent to the MicroRuby VM running the pseudo-shell app and reflected on screen.
Mouse interaction is still incomplete as well, so for now I move the shell window using the arrow keys.
Bouncing Ball App Demo Application Code
class BouncingBallApp < FmrbApp
  def initialize
    super()
    @counter = 0
    @bounce_count = 0

    # Ball properties
    @ball_x = @window_width / 2
    @ball_y = @window_height / 2
    @velocity_x = 3
    @velocity_y = 2
    @ball_radius = 8

    # Colors
    @bg_col = FmrbGfx::BLACK
    @ball_col = FmrbGfx::RED
  end

  def on_create()
    log_puts "[BallApp] on_create called"
    log_puts "[BallApp] user_area: x0=#{@user_area_x0}, y0=#{@user_area_y0}, width=#{@user_area_width}, height=#{@user_area_height}"
    log_puts "[BallApp] window: width=#{@window_width}, height=#{@window_height}"

    # Initialize ball position within user area
    @ball_x = @user_area_x0 + @user_area_width / 2
    @ball_y = @user_area_y0 + @user_area_height / 2

    draw_full_screen

    log_puts "load my_lib"
    require "/lib/my_lib"
    log_puts "load my_lib done"
    inspect_env

  end

  def draw_full_screen()
    @gfx.clear(FmrbGfx::WHITE)
    draw_window_frame
    draw_ball
    @gfx.present
  end

  def draw_ball()
    @gfx.fill_circle(@ball_x, @ball_y, @ball_radius, @ball_col)
  end

  def erase_ball()
    @gfx.fill_circle(@ball_x, @ball_y, @ball_radius, FmrbGfx::WHITE)
  end

  def on_update()
    # Erase old ball position
    erase_ball

    # Update ball position
    @ball_x += @velocity_x
    @ball_y += @velocity_y

    # Calculate user area boundaries
    left_boundary = @user_area_x0 + @ball_radius
    right_boundary = @user_area_x0 + @user_area_width - @ball_radius
    top_boundary = @user_area_y0 + @ball_radius
    bottom_boundary = @user_area_y0 + @user_area_height - @ball_radius

    # Check collision with left/right walls
    if @ball_x <= left_boundary || @ball_x >= right_boundary
      @velocity_x = -@velocity_x
      @ball_x += @velocity_x  # Move away from boundary
      @bounce_count += 1
    end

    # Check collision with top/bottom walls
    if @ball_y <= top_boundary || @ball_y >= bottom_boundary
      @velocity_y = -@velocity_y
      @ball_y += @velocity_y  # Move away from boundary
      @bounce_count += 1
    end

    # Draw new ball position
    draw_ball

    @gfx.present
    @counter += 1

    # Return sleep time in milliseconds (33ms = ~30fps)
    33
  end

  def on_event(ev)
  end

  def on_destroy
    log_puts "[BallApp] Destroyed"
  end
end

begin
  app = BouncingBallApp.new
  app.start
rescue => e
  log_puts "[BallApp] Exception: #{e.class}"
  log_puts "[BallApp] Message: #{e.message}"
end
What Has Been Implemented So Far
- OS Framework
- Implementation of basic functionality
- Launching multiple MicroRuby VMs using FreeRTOS tasks
- During the process of enabling multitasking, issues were found with memory space isolation and tick behavior, so patches have been applied. How these should ultimately be handled still requires further consideration.
- Launching a guest VM (Lua) using FreeRTOS tasks
- Memory pool management
- The system is designed so that each VM is assigned an independent memory pool. For memory allocation, the default estalloc allocator is used inside MicroRuby, while TLSF is used elsewhere. estalloc has also been configured to operate correctly in a multitasking environment.
- Foundation of an inter-core communication protocol
Currently implemented using sockets - Simple drawing API
RPC implemented on top of LovyanGFX
- For Linux
- Execution environment using SDL2 + LovyanGFX
- Audio is not yet implemented
- Execution environment using SDL2 + LovyanGFX
- For real hardware
- Porting the APU block from an NES emulator to the ESP32
- Proof-of-concept for fmrb-audio-graphics
- Simultaneous operation of LovyanGFX (NTSC) and the APU has been confirmed
- Board
- Design and implementation of a prototype board
- However, issues remain
- Design and implementation of a prototype board
- Applications
- Only development-time drawing samples so far
Future Development Items
- OS framework improvementsHID event handling / STDIO replacementWindow management (z-order, movement)Application lifecycle managementFullscreen modeGUI redesign
- LinuxExpanded graphics supportAudio implementation
- HardwareInter-core communicationUSB host support (keyboard, mouse)Sub-ESP32 firmware
- BoardDebuggingMass-production design
- ApplicationsShellFile managerGPIO/I2C sample apps
Looking Ahead
My next step is to submit a CFP to RubyKaigi, then aim for a full presentation.
This project is far too large to complete in a few months, so I plan to continue gradual development throughout the coming year.
Once things stabilize, I’d like to sell the board as a set at events.
Dreams
If this project takes shape, I’d like to explore:
- Enhanced inter-VM communication
- Integrating MicroPython and reusing its ecosystem
- Pixel-art and music editors for game development
- GUI-based GPIO and I2C control
- Wi-Fi connectivity and app sharing/downloading
- Ports to LCD-equipped ESP32-S3 or Tab5 devices
- A PicoCalc-style device with LCD and mini keyboard
- Browser execution via Emscripten, with sensors handled by companion boards
References
Picotron - Fantasy Desktop
I discovered this during development. While it’s not for microcontrollers, its UI closely matches my ideal vision.
It’s a retro, 8-bit-style game development environment.